Wednesday, March 21, 2012

COBIT Assessment Programme—Frequently Asked Questions (FAQs)


@: Why did ISACA select ISO 15504?
ISO 15504 effectively deals with a capability process assessment. It provides an understandable, logical, repeatable, reliable and robust methodology for assessing the capability of IT processes (evidentiary requirements).
@: What is the major value of using the new COBIT Assessment Programme?
a. The value derived from assessments using this approach includes reliable results that focus the enterprise on the benefits and resource implications arising from the performance and capability of its IT processes, and provide a sound basis for benchmarking and improvement, prioritization and planning.
b. There are a number of specific benefits for COBIT users in taking this approach:
- Focus first on confirming that a process is achieving its intended purpose anddelivering its required  
   outcomes as expected.
- Simplification of the content supporting process assessment.
- Improved reliability and repeatability of process capability assessment activities and evaluations, reduced 
   debates and disagreements between stakeholders on assessment results.
- Increased usability of process capability assessment results, as the new approach establishes a basis for 
   more formal, rigorous assessments to be performed, for both internal and potential external purposes such 
   as benchmarking.
- Compliance with a generally accepted process assessment standard (ISO 15504) and therefore strong 
   support for process assessment approach in the market.
@:Does the new COBIT Assessment Programme approach replace the existing COBIT 4.1CMM approach?
a. No, it does not; it is a different approach to assessing process capability that ISACA has selected to use. COBIT 4.1 CMM remains as published and the option of applying
a COBIT Assessment Programme approach as an alternative has been made available.
b. However, The CMM approach will not be offered in COBIT 5 because the new ISO
15504 approach is core to performing a capability process assessment using COBIT 5 content.
@: What is the difference between the COBIT 4.1 CMM and the new COBIT Assessment Programme approach?
a. The capability level scale is the same, i.e., 0 to 5 and some of the level names are very similar, but that is where the similarities end. The attributes assessed and measured in each approach are NOT the same nor is there a clean cut relationship between the two sets of attributes.
b. There are no specific requirements to provide evidentiary support for assessment results in the existing COBIT 4.1 CMM approach, but this is mandatory in the ISO 15504 approach. Providing such evidence in support of the assessment produces more robust, repeatable and defensible results.
c. The assessment done under the old COBIT 4.1 CMM approach will likely result in “higher scores,” due to the subjective averaging approach adopted, and also due to the more rigorous ISO 15504 requirements for level 1 in the new approach
@: Will COBIT 5 have the same process capability assessment approach using ISO 15504? And how will it differ?
a. COBIT 5 has been designed taking into account all of the ISO 15504 process capability assessment requirements. As a result the consistency of content between the COBIT 5 process content and the COBIT 5 PAM will be improved over those of COBIT 4.1.
b. For the purposes of applying the COBIT Assessment Programme approach, the only difference between COBIT 4.1 and COBIT 5 will be the level 1 content which is specific and unique to each framework version. Assessment levels 2 to 5 focus on generic process attributes (as defined in ISO 15504) and are therefore the same for both frameworks.
@:Why would you want to do a COBIT process capability assessment using COBIT 4.1 when COBIT 5 will be available in early 2012?
Enterprises have invested in using COBIT 4.1 and will continue to use it for a number of years—until a driver is encountered for them to consider a transition to COBIT 5. During this time a formal process capability assessment against COBIT 4.1 will be of value to them.
@: How is assessing cloud different from assessing other services?
There is no difference, cloud services are a subset of IT services, Infrastructure as a Service (IaaS), Platform as a Service (PaaS) and Software as a Service (SaaS). Regardless of the deployment model, private, public etc, cloud computing is a delivery of a service in the same way as any other IT service delivery; ISACA cloud publications provide a predefined selection of COBIT processes; the assessment of the processes itself will be the same for cloud as for any other IT service delivered. . For more information on
ISACA’s cloud publications visit: www.isaca.org/cloud
@: What other models, frameworks and approaches have been aligned to ISO 15504?
a. ITIL3 has been mapped to ISO 15504 but only at level 1; i.e., a Process Reference Model (PRM) has been developed and released via a Tudor publication. However, to our knowledge no full PAM has been developed.
b. The ISO group responsible for ISO 20000 on IT service management is also in the process of developing an ISO 15504 PAM
c. COSO has also developed an ISO 15504 PRM (level 1 only) but not a full PAM.
@:How long on average does a COBIT Assessment take to execute?
a. There is no specific answer to this as it depends on the scope of the assessment; 3 processes vs. 34/37. It depends on the business need and what processes management would like to see assessed/improved.
b. ISACA has provided a scoping tool as part of its tool kit to assist organizations in selecting processes to scope. (See tool kit link on the web site.)

@: If all of the work (heavy lifting) is done to achieve level 1, which is deemed to be a
major achievement, what is the incentive to go to further levels of capability? Is it not a “nice to have’?”
a. There is always a cost/benefit trade off in how high a capability level an organization wants to achieve and indeed many organizations have focused a lot of their attention at level 1 because this is a major achievement to show that your processes are meeting fully their purpose.
b. Level 3 is seen by ISACA as the level that enterprises should aspire to for consistency in the performance of their processes irrespective of the staff involved.
c. Levels 4 and 5 will depend on the industry and product sector, so for example to meet a government contract to provide defense technology an organization may be
required to show a level 5 capability, i.e., “their processes are optimized.”
@: What tools are available to assist assessors in performing these process capability assessments?
a. ISACA has provided a tool kit for both the assessor and the self‐assessment guide.
b. There are also commercial organizations that provide ISO assessment tools both online and via software download that can be tailored to a specific organization’s needs.

Friday, March 16, 2012

PHP: Upload DBF File using Temporary Table


On this occasion I would like to share the writing of PHP programming script to import DBF file solutions. The method applied in this case is to import DBF file to a temporary table and then  stored into the next main or transactional table. The following more detailed explanation:

1. Prepare koneksi.php which serves as a database connection module and put into the LIB folder
2. Prepare the dbf_class PHP class that can be downloaded at and put into the LIB folder
3. Here is the script for the DBF file upload browse file method

<form name="form1" action="save.php" method="post" enctype="multipart/form-data" >
<?

class timerClass
    {
    var $startTime;
    var $started;
    function timerClass($start=true)
        {
        $this->started = false;
        if ($start) $this->start();
        }
  
    function start()
        {
        $startMtime = explode(' ',microtime());
        $this->startTime = (double)($startMtime[0])+(double)($startMtime[1]);
        $this->started = true;
        }
  
    function end($iterations=1)
        {
        $endMtime = explode(' ',microtime());
        if ($this->started)
            {
            $endTime = (double)($endMtime[0])+(double)($endMtime[1]);
            $dur = $endTime - $this->startTime;
            $avg = 1000*$dur/$iterations;
            $avg = round(1000*$avg)/1000;
            return "$avg milliseconds";
            }
        else
            {
            return "timer not started";
            }
        }
    }

if (isset($_POST['X']))
if ($_FILES['filenya']['size']>150000)
    {
    echo "<script>alert('File to big [max150Kb]')</script>";
    }
else
    {
    $thefile = '';
    $name = $_FILES['filenya']['name'];
  
    if (move_uploaded_file($_FILES['filenya']['tmp_name'],"dbf/$name")) $thefile = 'dbf/'.$name;
    include('./lib/koneksi.php');
    include('./lib/dbf_class.php');
    $timer = new timerClass();
    $timer ->start();
    $dbf = new dbf_class($dir.$thefile);
    $num_rec=$dbf->dbf_num_rec;
    $field_num=$dbf->dbf_num_field;
    $endexct = $timer->end();

    for($i=0; $i<$num_rec; $i++)
        {
        if ($row = $dbf->getRow($i))
            {
            $sql_sintax="";
            for($j=0; $j<$field_num; $j++)
                {
               
                switch ($j) {
                    case 0 : $kd_unit_tmp = substr($row[0],0,6);break;
                    case 1 : $tgl_order_tmp = $row[1];break;
                }
                   
               
                if ($dbf->dbf_names[$j]['type']=='N')
                    {
                    $sql_sintax = $sql_sintax . $row[$j] . ",";
                    }
                else if ($dbf->dbf_names[$j]['type']=='C')
                    {
                    $sql_sintax = $sql_sintax . "'" . $row[$j] . "',";
                    }
                else if ($dbf->dbf_names[$j]['type']=='D')
                    {
                    $sql_sintax = $sql_sintax . "date('" . $row[$j] . "'),";
                    }
                }
            $pjg_query= strlen($sql_sintax);
            $sql_sintax = "INSERT INTO temp_order VALUES (" . substr($sql_sintax, 0, $pjg_query-1) . ")";
           
            $sql_out=mysql_query($sql_sintax) or die ("<script>alert('data doble!')</script>");
            }
        }
    unlink($thefile);
  
  
    // output from  MySQL table
    $header=1;
    $kecuali="";
    $no=1;
    $sql_sintax = "select *    from temp_order where left(kd_order,6)='".$kd_unit_tmp."' and tgl_order=date('".$tgl_order_tmp."')";
    $sql_out=mysql_query($sql_sintax) or die ($sql_sintax);
    while ($row=mysql_fetch_array($sql_out))
        {
        $kd_order=$row["kd_order"];
        }
       
        if ($header)
            {
                echo "For HEADER display Table";

            }
                echo "detail row";
           
?>

  <div align="right">
    <input type="hidden" name="kd_unit_tmp" value="<?=$kd_unit_tmp?>">
    <input type="hidden" name="kecuali" value="<?=$kecuali?>">
    <input type="reset"  name="Cancel" value="Batal">
    <input type="submit" name="Submit" value="Konfirmasi">
  </div>
</form>

 4. Here is the script for save into main or transactional table and clear the temporary table
<?
include('./lib/koneksi.php');

$kd_unit=$_POST['kd_unit_tmp'];
$kecuali = $_POST['kecuali'];
echo "submit : " . $_POST['Submit'];
echo "kd_unit : " . $kd_unit;

if (isset($_POST['Submit']))
                {
                $perintah="insert into .......( main table )";
                $hasil=mysql_query($perintah) or die ($perintah);
                }
                
                // delete temporary
                $perintah="delete from temp_order where left(kd_order,6)='$kd_unit'";
                $hasil=mysql_query($perintah);

?>

<html>
<head>
<title>Save</title>
<meta http-equiv="Content-Type" content="text/html; charset=iso-8859-1">
</head>

<body onLoad="document.location='index.php'">

</body>
</html>

hope this article useful for you to see you at the other posts

Tuesday, March 13, 2012

PHP:Security in PHP programming

Make some PHP applications is pretty easy. Most people grasp the syntax rather quickly and will within short time be able to produce a script that works using tutorials, references, books, and help forum. The problem is that most people forget one of the most important aspects that one must consider when writing PHP applications. Many beginners forget the security aspect of PHP. Generally, your users are nice people, they will do as they are told and you will have no problem with these people whatsoever. However, some people are not quite as nice. Some people are outright malicious and are seeking to do damage on your website. They will scrutinize your application for security flaws and exploit these holes. Many times the beginner programmer did not know that these things would even be a problem and therefore it might be a problem to fix the holes. In this tutorial we will look at some of these issues so you can learn how to deal with them, and better yet, prevent them. Obviously I will not promise you that by following this tutorial you will never get successfully attacked. As you become bigger you will also become a bigger and therefore more interesting target.phpSec is a open-source PHP security library that takes care of the common security tasks a web developer faces.

phpSec is pretty plug and play there are needs some steps to take before you are ready to harness the power of phpSec. The first thing is to include phpSec into your application.


require_once 'phpsec.class.php';

You should be all set to start using phpSec on your application as below

1    require_once 'phpsec.class.php';
2    phpsec::$_dsn = 'filesystem:/var/www/phpSec/data';
3    phpsec::init();

Session Handler
All session data is encrypted using a user specific encryption key that is stored in a cookie on the users computer. This key is changed each 30 seconds. The data is saved in the phpSec store, allowing for storage in databases or flat files.
Easy to use

All you have to do to use the phpSec session handler is to add phpSec to your application as described in the getting started page. The session handler is enabled by default.
To disable just set phpsec::$_sessenable to false like this:

1    require_once 'phpsec.class.php';
2    phpsec::$_dsn = 'filesystem:/var/www/phpSec/data'; /* Note the filesystem: before the path. */
3   
4    phpsec::$_sessenable = false; /* Disable phpSec session handler. */    
6    phpsec::init();

Encrypting data in PHP can be done easy with phpSec. phpSec implements symmetric encryption using the mcrypt library, end is extremely easy to use.
for example

1    <?php
2    $data = 'This is some extremely secret information.';
3    /* Encrypt. */
4    $encrypted = phpsecCrypt::encrypt($data, 'secret key');
5    /* Decrypt. */
6    $data = phpsecCrypt::decrypt($encrypted, 'secret key');


Password hashing
To create a salted hash we use the phpsecHash:create() method. It takes just one argument and that is the password you wish to create an hash from.

1    <?php
2    require_once 'phpsec.class.php';
3    phpsec::init();
4   
5    $hash = phpsecHash::create('password');
6    echo $hash;

Validating passwords
When validating password we use the phpsecHash::check() method. This method takes two arguments. The first is the password we want to check, and the second is the hash we created before. phpsecHash::check() will atomatically detect the method used to create the hash.

1    <?php
2    require_once 'phpsec.class.php';
3    phpsec::init();
4   
5    if(phpsecHash::check($_POST['password'], $hash)) {
6      echo "Valid password";
7    }

Changing hash method
There are several options you could use to tune phpsecHash the way you want it to work.

    phpsecHash::BCRYPT
    phpsecHash::PBKDF2
    phpsecHash::SHA256
    phpsecHash::SHA512

1    <?php
2    require_once 'phpsec.class.php';
3    phpsec::init();
4    phpsecHash::$_method = phpsecHash::BCRYPT;
5   
6    $hash = phpsecHash::make('password');
7    echo $hash;

I think this is the best breakthrough in the field of PHP programming, however it is still in beta release, we will wait for the version that is even better

source: http://phpseclib.com/download

Wednesday, March 7, 2012

SHA2 vs MD5 Encryption Method

Data security has become a basic need in every organization or company. Generally, to support their businesses,organizations or companies need a mean of communication between the branch offices so that intranet is needed. Basically, intranet is a local network and internet is an open network and has not a security mechanism on its protocol (TCP/IP). A security mechanism which guarantees command integrity and authenticity is needed. The selected message security mechanism which uses the cryptography technique using SHA-512 is implemented to guarantee data integrity and authenticity.

MD5 encryption method
MD5 is one of a series of message digest algorithms designed by Professor Ronald Rivest of MIT (Rivest, 1994). When analytic work indicated that MD5's predecessor MD4 is to be insecure, MD5 was designed in 1991 as the successor of MD4 (MD4 weaknesses found by Hans Dobbertin). In cryptography, MD5 (Message-Digest algortihm 5) is a cryptographic hash function is used extensively with 128-bit hash value.
On the Internet standard (RFC 1321), MD5 has been utilized in a variety of security applications, and MD5 are also commonly used for testing the integrity of a file.

SHA is a set of cryptographic hash functions designed by the National Security Agency (NSA) and published by NIST as a U.S. Federal Information Processing Standard.
SHA is the Secure Hash Algorithm. The types of the SHA SHA-0, SHA-1, and SHA-2.
For SHA-2 algorithms are identical to the summary measure of well-known variables as SHA-224, SHA-256, SHA-384, and SHA-512.

Peter Selinger has made a demonstration of two different pieces of executable files but have the same MD5 hash value. The scenario is of two files one is the original file, another is a bad file. Both have the size and the same MD5 hash value.
This will trick the similarity hash Tripwire and the people who download files from the internet. Tripwire will silence even though the file has been modified executables attacker. So wheb the man who download an executable file from the internet
it turns out that he had received file has been changed mid-way.
However, because after the calculated value hash matches with the original file, the victim will think that's true and original file but different.

Why SHA512 is a superior hashing algorithm to MD5.
It depends on your use case. But there are areas where MD5 has been broken:

1.    For starters: MD5 is old, and common. There are tons of rainbow tables against it, and they're easy to find. So if you're hashing passwords (without a salt - shame on you!) - using md5 - you might as well not be hashing them, they're so easy to find. Even if you're hashing with simple salts really.
2.    Second off, MD5 is no longer secure as a cryptographic hash function (indeed it is not even considered a cryptographic hash function anymore as the Forked One points out). You can generate different messages that hash to the same value. So if you've got a SSL Certificate with a MD5 hash on it, I can generate a duplicate Certificate that says what I want, that produces the same hash. This is generally what people mean when they say MD5 is 'broken' - things like this.
3.    Thirdly, similar to messages, you can also generate different files that hash to the same value so using MD5 as a file checksum is 'broken'.

Algorithm SHA-512 hash functions including the type of which is the development of the algorithm SHA-1. hash function
map the message regardless of length M with a hash value of fixed length h (particular, depending
the algorithm). For the algorithm SHA-512 hash value of the resulting length is 512 bits. Hash function that
produces output with its small size vulnerable to attact birthday [4]. This attack was carried out with
how to get two random messages that have the same hash value h.
SHA-512 as the hash function has properties as follows:
(1). h is easily calculated when given M.This trait is a must, because if h is difficult calculated, then the hash function can not be used.
(2). M can not be counted if it is only known to h.This trait is also called one-way function, or easy to calculate h and difficult to be returned to the M
original. These properties are important in cryptographic techniques, as if without this trait then the attacker can find the value of M by knowing its hash value h.
(3). It is impossible sought M and M 'such that H (M) = H (M').This trait is also called collision free. These properties prevent the possibility of forgery.


Tuesday, March 6, 2012

Setting Database Sybase Anywhere

Here is an explanation for setting up databases Sybase Anywhere on the Server side and Client on windows XP or 7

Server
side
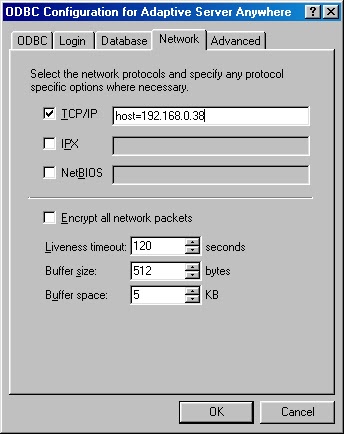
Go to control panel then odbc menu and do like the picture below, don't forget you must set path to the DBSERV#.exe, ADD ODBC for Adaptive Server Anywhere, and many library of database Anywhere. You must define login and password for database in login tab

Client side
Go to control panel then odbc menu
ADD ODBC for Adaptive Server Anywhere and do like the picture below, set the IP server on client set. Yau must define login and password for database in login tab
 

Friday, October 14, 2011

Creating and configuring a MySQL DataSource in GlassFish Application Server.

Creating and configuring a MySQL DataSource in GlassFish Application Server.

Follow the below steps for creating and configuring a MySQL DataSource in GlassFish application server.
1. Download MySQL JDBC driver from http://dev.mysql.com/downloads/connector/j/3.1.html
2. Extract the contents of the zip file
3. Copy mysql-connector-java-x.x.x-bin.jar to GLASS_FISH_INSTALL_DIR\lib folder.
3. Start your GlassFish Application server by issuing the command ‘asadmin.bat start-domain domain1′ from GLASS_FISH_INSTALL_DIR\bin directory.
4. Login to GlassFish admin console. The default url for GlassFish admin console will be http://localhost:4848/login.jsf. The default username and password for accessing the admin console will be admin and adminadmin respectively.
5. From Common Task menu expand Resources menu by clicking on Resources menu.
6. Expand JDBC under resources.
7. Click on ‘Connection Pools’ under JDBC menu. The Connection Pools page will be displayed.


8. Click on New.
9. Enter a name for your JDBC Connection pool. Select javax.sql.ConnectionPoolDataSource as your ‘Resource Type’ and select MySQL as your ‘Database vendor’.


10. Click on Next.
11. Fill the details according to your need. Minimum you need to fill the following fields.

a. DatabaseName
b. Password
c. URL (The format will be jdbc:mysql://localhost:3306/test. Where test is your database name.)
d. Url (The format will be jdbc:mysql://localhost:3306/test. Where test is your database name.)
e. ServerName
f. User
12. Click on Finish. You will be taken back to the Connection Pools page.
13. Click on the Connection Pool you created. You will be taken to ‘Edit Connection Pool’ page.
14. Click on Ping. If your connection pool is setup correctly you will get a Ping Succeeded message.


15. Now click on JDBC Resorces under JDBC menu.
16. Click on New.
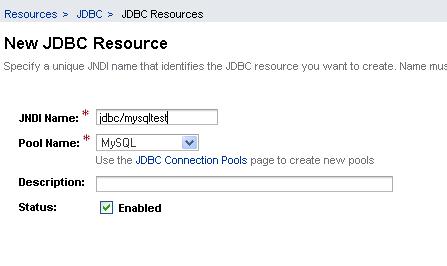
17. Enter a JNDI Name for your data source. Select the pool you created by following the above steps as your ‘Pool Name’.


18. Click on OK. You are done.To obtain a connection using the above DataSource, use the following code.

Source: http://www.albeesonline.com
http://www.albeesonline.com/blog/2008/08/06/creating-and-configuring-a-mysql-datasource-in-glassfish-application-server/

Wednesday, October 12, 2011

What is ISO8583

What is ISO8583? Of course we are familiar with the name of the ISO, which is an international organization dealing with the standardization of products. Well, related to ISO8583, is a messaging standard relating to financial data. Usually my friends working in the field of financial transactions, such as in areas of banking, data switching, ATM, EDC is no stranger to being on this one. I, incidentally, including those unfamiliar with this ISO8583. I first saw her message is full of examples of alpha-numeric characters long and can not be read as. Finally after reading some of the references, data contained on a row of characters.

ISO8583 structure

Normal 0 false false false EN-US X-NONE X-NONE MicrosoftInternetExplorer4

Normal 0 false false false EN-US X-NONE X-NONE MicrosoftInternetExplorer4

ISO8586 structure consists of three parts:

MTI (Message Type Indicator)

MTI explain what kind of message he sends, a message transaction or inquiry message (non transactional). MTI is composed of 4 digits.

- Digit 1: show version

- Figure 2: shows the message class

- Digit 3: The message sub class

BIT MAP

A bit map is an indexing technique in ISO 8583 are used to identify whether a data element at the specified index position there or not. There are two kinds of bit map,


The first primary and secondary bitmap bitmap. Primary bitmap memilikin indexs 1-64,

both secondary bitmap 65-128. If the secondary bitmap appears, then bit one must be active.

Data Element

The data elements indicate the data that will be sent in a transaction in the body of ISO 8583. Eg the example bit:

Normal 0 false false false EN-US X-NONE X-NONE MicrosoftInternetExplorer4


Bit 2 contains information atm card number.
Bit 4 contains information the transaction amount.
Bit 32 contains the code bank.
Bit 18 contains the type of channel (sms / EDC / atm).
Etc ... .. up to 128.

Tuesday, March 8, 2011

Installation Modem Smartlink with Ubuntu 9.10


You are using Ubuntu 9.10 - the Karmic Koala - released in October 2009 and supported until April 2011. This section is an introduction how to install modem smartlink with Ubuntu 9.10
The kernel is "Linux xxx-desktop 2.6.31-14-generic #48-Ubuntu SMP Fri Oct 16 14:04:26 UTC 2009 i686 GNU/Linux"

#!/bin/bash
zz@zz-desktop:~$ lspci

03:01.0 Modem: Smart Link Ltd. LM-I56N (rev 02)

(launcher script)

#!/bin/bash

sudo slmodemd -c INDONESIA /dev/slamr0 & sudo wvdial ; sudo killall slmodemd ;


(wvdial script)

[Dialer Defaults]

Init1 = ATZ

Init2 = ATQ0 V1 E1 S0=0 &C1 &D2 +FCLASS=0

Modem Type = Analog Modem

ISDN = 0

Phone = 99999999999

New PPPD = yes

Modem = /dev/ttySL0

Username = userid

Password = password

Baud = 460800

Carrier Check = no


Tuesday, February 1, 2011

Upgrade Nexian journet A890 to Froyo

About 2 months ago I bought nexian journey base on android ,this is our experience about installing android froyo,The first Cyanogen Mod build for Nexian Journey is quite the rush. By default, the CPU is forced to run at 800 MHz, that’s more than the 600 MHz capability of the phone. Luckily, the next build now defaults to 600 MHz and that’s the build I’m upgrading my phone with.

The requirements to upgrade is the following:

1. Upgrade your phone to Eclair if you’re not already in Eclair. Steps to do so after the break. Download CMLMod 1.3 here for some Eclair love.
2. You will need Clockwork recovery image after flashing CMLMod 1.3, download here.
3. This is the best part, Cyanogen Mod 6.1 Build 7 for your Journey, download here. [UPDATE] Stable Release 6.1.1 .
4. Google Apps – MDPI here.
5. A decent laptop/pc or a Mac with Parallels and Windows XP will do.
6. Android Rom Upgrade Tools (RUT) and Drivers for 32 bit windows here, 64 bits windows here or both here.
7. Fastboot windows, you can download with google.

Nowadays, rooting is a very easy task. It’s already built into the recovery image, what else can you ask?

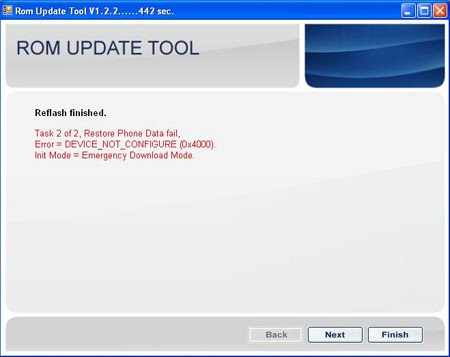
for this i give u the picture and so here are the steps:

1. Skip to step 7 if you’re already in eclair. If not, backup everything precious located on your phone’s memory and let’s begin.
2. *UPDATE* Before plugging in to RUT, power off your phone and press HANG UP soft button, VOLUME UP and POWER to enter Download mode. Fire up the RUT you downloaded earlier above, click on NEXT until you find the dialog asking you to specify the ROM you’re gonna flash. Point it to your CMLMod 1.3 .nb0 file.
3. Power off your Journey and power it back on by pressing CAMERA, VOLUME UP and POWER. Now plug the USB cable in and RUT will detect your phone. Point it to the drivers you’ve downloaded before.
4. Follow all the steps until your phone finally boots to CMLEclair 1.3.
5. When you’re in, power the phone off again. Bring it back on by pressing CAMERA, VOLUME UP and POWER to reenter recovery mode. Now look for the option to ENABLE ROOT. Scroll with your trackball, select by pressing the trackball and confirm by pressing the HOME soft-button.
6. When you’re done rooting, turn it off again.
7. Power on the phone by pressing RED/HANG UP, VOLUME DOWN and POWER to enter Fastboot mode.
8. Windows will ask for drivers and point it to the android drivers you downloaded earlier.
9. Open up a command prompt and go to the folder where you downloaded fastboot. To keep it simple, I put fastboot and Clockwork recovery image on C:\

cd \
fastboot-windows flash recovery clockwork-z71.img
fastboot-windows reboot

10. Your phone will reboot. Once you’re in, copy the Cyanogen Mod ROM file and Google Apps to your SD Card then power off your phone again and bring it back on by pressing CAMERA, VOLUME UP and POWER.
11. Once you’re in RECOVERY MODE, scroll to INSTALL ZIP FROM SDCARD by using the VOLUME UP or VOLUME DOWN button. Please note that when you press and release the volume buttons, it’ll be counted as 2 scrolls. Press the trackball to make your choice.
12. Select the Cyanogen Mod zip file and confirm flashing.
13. Select Google Apps zip and confirm flashing.
14. Use the BACK soft-button to go back to where you started, select WIPE DATA/FACTORY RESET and confirm.
15. Select WIPE CACHE PARTITION.
16. Select ADVANCED >> FIX PERMISSIONS
17. Back to the beginning, select ENABLE ROOT to live on the edge ;)
18. REBOOT!

Source : www.bango29.com


Tuesday, January 18, 2011

After Install Ubuntu 9.10 ( Carmic)

Ubuntu 9.10 ( Carmic) presents really cool view of dark color. A lot of improvement there , more faster, more responsiveness, but a lot of things you should do after installing Ubuntu 9.10.

Install VGA Driver
Install the VGA driver is needed for users compiz fusion to create the look interesting. To install it go to Applications -> Ubuntu Software Center looking for "NVidia Drivers" (if you use NVidia VGA). After installing VGA restart the computer and the VGA driver is active.

Install Multimedia
DVD, Divs, Xvid, MP3, WMA, MOV, etc.
Applications -> Ubuntu Software Center and search Gstreamer plugins

Install package rar
Files. rar is much scattered on the internet, ranging from ebooks, music, movies and others. to install the rar package Application -> Terminal
sudo apt-get install rar unrar

Mount hardisk
sudo apt-get install pysdm

Install Adobe Flash Plugin
Applications -> Ubuntu Software Center and search Adobe Flash Plugin

Update new package
Sudo apt-get update

Setting the download package ubuntu
System -> Administrasion -> Software Sources -> Ubuntu Software check the source code instead of downloading from a server for Indonesia

Instal JVM (Java Virtual Machine)
Application -> Ubuntu Software Center search Java
install Sun Java Runtime

Change your wallpaper
Klik right on mouse and Change dekstop background and then choose wallpaper that you like

Monday, January 17, 2011

Wasteful Battery on Nexian Journey (Android)


If you users nexian journey android one of the major constraints is the problem of wasteful battery. There are several ways to save on battery usage on nexian journey

WIFI (OFF)
Mobile Network Data Enabled (OFF)
Use GPS Satellites OFF
Bluetooth OFF
Network Mode WCDMA GSM Auto (atau GSM Only)
Brightness less than 50%
wallpaper offline mode
Performance setting in CML are set On-demand or Economic

On Demand and Economic Differences:

If On Demand processor will automatically increase the speed if required (eg run a specific program) and will automatically come down to the lowest speed if no program-run / is idle (19.2 not like writing CMLMod 120Mhz)

If Economic almost the same as on demand, the difference between the highest processor speed only a maximum of 320Mhz

when it all but still want to run more efficient, in fact there is one thing which does can do is auto power off before we can use sleep aplication TimingOff aplication (can be taken for free at the Market), there schedulenya android every hour how we will die (usually at 12 am )

Friday, January 14, 2011

Upgrade Nexian Journey A890-2.1 Eclair w/CMLMod


WARNING

  • Jika Anda melakukan upgrade atau menginstall ROM sendiri tidak melalui service center mungkin akan menghanguskan garansi HP anda

  • Dimungkinkan HP anda menjadi rusak jika dalam proses upgrade tersebut tidak berhasil

  • Seluruh data yang ada di HP anda kemungkinan akan hilang

Requirements:

  • PC minimal Windows XP sp3 ( not for Win Vista/7 64 bit)

  • Kabel USB

  • Batre HP Mencukupi

File

  • ROM Apanda 1.6.2 (Donut)

  • CMLEclair1.3

  • Driver PC

Part 1 (Install Apanda 1.6.2)

  • Download dan eksrak driver dan pastikan lokasinya telah anda ketahui

  • intall RUT_V1_2_2 yang ada dalam CMLEclair1.3.rar

  • Ektrak firmware 1.6.2 dari archive Hipi1_6_2.rar isinya file dengan ekstenti .nb0

  • Jalankan RUT (ada shortcut di desktop anda).

  • Setelah RUT jalan, klik next 2 kali, kemudian cari dan pilih file yang berekstensi .nb0

  • Ikuti instruksi – Cabut HP dari PC dan Cabut Batre HP anda

  • Tekan dan tahan tombol kamera dan tombol volume secara bersamaan dan tekan tombol power untuk memasuki menu recovery

  • Setelah masuk ke menu recovery, sambungkan HP anda ke PC

  • Installer akan mendeteksi HP anda

  • Mulai dan ikuti petunjuk di layar dan tunggu, butuh waktu beberapa lama sampai proses update selesai

  • Hp akan restart secara otomatis

Sekarang Nexian Journey anda sudah terisi ROM Donut punyanya Apanda

Part 2 ( Install CMLEclair1.3)

  • Ekstrak CMLEclair1.3.rar

  • Jalankan lagi program RUT dan pilih CMLEclair1.3.nb0 yang telah di ekstrak dari file diatas

  • Cabut Batre dan restart hp

Part 3 (Aktifasi App2sd)

  • Setelah HP anda dalam posisi on masuk ke main menu dan kemudian cari icon CMLMod

  • Pilih Configurasi App2sd

  • Pilih Partionar SD

  • HP Anda akan restart ke recovery mode

  • Sekarang pilih partition sdcard, partition SD dan konfirmasi tombol Home key set swap=0, ext2=512 dan konfirmasi lagi

  • tekan tombol back dan pilih Enable APP2SD

Sekarang setiap aplikasi yang terinstall akan masuk ke Sdcard anda.


Thursday, January 13, 2011

Switch Database on Login Page with PowerBuilder


Many ways to connect in mysql database in PowerBuilder.To perform database selection directly on the login page using PowerBuilder application and database mysql we can use this script that can be placed on the login button.
Put your drop down list box on login page as a swicth control to database (ls_db). For exp we can say production_db for real operation and UAT_db for testing application. this is
pretty easy ok

//=== variable ==
String ls_db Integer li_install, li_count


ls_db = ddlb_0.text

////***** Profile database******for mysql****
SQLCA.DBMS = ProfileString(gs_path + "\proto.INI",ls_db,"DBMS", " ")
SQLCA.AutoCommit = false
SQLCA.DBParm= ProfileString(gs_path + "\proto.INI",ls_db,"DbParm", " ") + ";UID=root;PWD=mounxxxx;OPTION=135168',DisableBind=1,StaticBind=0,PBUseProcOwner=NO"

connect using sqlca;

if isnull(sqlca.sqlcode) or sqlca.sqlcode <> 0 then
messagebox("Database Not Connect ",string(sqlca.sqlcode)+sqlca.sqlerrtext)
return
else

//…open the application

End if

Friday, January 7, 2011

Windows Aplication Running on Ubuntu

This story is continued from the previous story about how windows connection with database application MYSQL on Ubuntu Linux Operating System. I have the application built with PowerBuilder 7 and I try to run on the OS. The result was encouraging that applications can run well and have a fairly good performance. Berikut ini adalah langkah-langkah yang saya lakukan untuk instalasi tersebut:

Install The Application


Chosing application folder
Chosing Platform Aplication ( when we running on UBUNTU WINE then we chose windows platform when install it )
IP dan Port Database
Chose Library to connecting MYSQL Database
  • ODBC32
  • ODBCCP32
  • Ole32
  • Msvclrt
Installing MDAC 2.8


No need reboot and aplication run very well